
Last updated on August 28th, 2026 at 09:37 am
Sheet metal fabrication is a versatile manufacturing process used to produce everything from early prototypes to low-volume production parts and assemblies. For mechanical engineers, small decisions made early in CAD can have a significant impact on cost, lead time, and manufacturability.
Material, thickness, bend geometry, tolerances, and press brake access all affect how efficiently a design can move from CAD to a finished part.
Here are five practical, shop-proven sheet metal design tips based on real-world fabrication experience at Approved Sheet Metal.
1. Choose Material Based on Function and Manufacturability
Material choice has a direct impact on part cost, lead time, weight, strength, corrosion resistance, finishing options, and manufacturability.
When the functional requirements allow multiple material options, choosing a commonly stocked material can reduce both sourcing time and cost.
For formed aluminum parts, for example, 5052-H32 is often a practical choice because of its availability and formability. 6061-T6 aluminum offers different mechanical properties but is less ductile and typically requires larger bend radii.
Likewise, aluminum should not be substituted for stainless steel simply to reduce cost if the application requires the strength, temperature performance, corrosion resistance, or other properties of stainless.
Consider these factors when selecting sheet metal:
- Strength requirements
- Weight
- Corrosion resistance
- Formability
- Weldability
- Electrical or thermal requirements
- Finish requirements
- Material availability
- Cost
Review Approved Sheet Metal’s full list of available materials when evaluating options for your project.
Sheet Metal Material Deep Dive Articles:
- Choose the Right Material Thickness for Your Custom Metal Fabrication
- 3 Ways to Optimize Your Sheet Metal Material
- Choose the Right Material to Speed Up Lead Time for Precision Sheet Metal Parts
- Aluminum 5052-H32 vs. 6061-T6 for Custom Sheet Metal Fabrication
- 5052, 6061, 7075: ASM’s Guide to Sheet Metal Aluminum Grades
2. Design Around Standard Material Thicknesses
Designing around commonly available sheet metal thicknesses can improve manufacturability and reduce sourcing challenges.
Approved Sheet Metal can fabricate material up to approximately 1/4 inch (6.35 mm) thick depending on the material and part geometry.
As material thickness increases, several other design considerations change as well, including:
- Required forming force
- Practical bend radii
- Minimum flange dimensions
- Hardware compatibility
- Part weight
- Tooling requirements
- Press brake access
A thickness that is easy to laser cut may still create challenges during forming if the part has short flanges, deep geometry, tight bends, or limited tooling clearance.
Using commonly stocked thicknesses when the design allows can also help avoid special material sourcing that adds cost or lead time.
Do not choose thickness based on availability alone, however. The material still needs to satisfy the structural, functional, environmental, and assembly requirements of the finished part.
3. Keep Bend Geometry and Radii Fabrication-Friendly
Simple, accessible bend geometry is one of the most effective ways to make a formed sheet metal part easier and more economical to manufacture.
Use bend radii that are appropriate for the material, alloy, temper, thickness, and available tooling. Avoid relying on a universal rule such as specifying an inside bend radius equal to the material thickness for every part.
Different materials behave very differently during forming. 5052-H32 aluminum, for example, is generally more forgiving for tight formed geometry than 6061-T6 aluminum.
Whenever the design allows, using a consistent bend radius throughout a part can also reduce tooling changes and simplify the forming process.
Other features to consider around bends include:
- Minimum flange lengths
- Holes and slots near bend lines
- Hardware near bends
- Reliefs at corners
- Return flanges
- Offsets and hems
- Formed features near the bend
Holes, slots, hardware, and other features placed too close to a bend may distort during forming or interfere with tooling and hardware installation.
Refer to Approved Sheet Metal’s Design Guide for additional sheet metal design-for-manufacturing guidance.
Sheet Metal Forming Deep Dive Articles:
- Are You Using the Right Bend Radius for Your Precision Sheet Metal Formed Part?
- The Best Metal Bending Solution for Sheet Metal Prototyping
- Use This Flange Formula for Sheet Metal Forming
- Designing and Forming U-Shaped Sheet Metal Fabricated Parts
- The 3:1 Rule for Precision Sheet Metal Punch Forming
4. Apply Tight Tolerances Only Where They Matter
Not every dimension on a sheet metal part needs the same level of control.
Tight tolerances should be reserved for dimensions that directly control fit, function, or assembly. Applying unnecessarily tight tolerances to non-critical dimensions can increase manufacturing and inspection requirements without improving the performance of the finished part.
Features that may justify tighter control include:
- Mating hole patterns
- Critical hardware locations
- Assembly interfaces
- Locating features
- Critical overall dimensions
- Features that control alignment with another component
Other dimensions may have substantially more flexibility when they do not affect the function of the finished product.
Formed dimensions deserve particular attention because multiple bends can contribute to the final location of a feature. Instead of tightening every dimension in an attempt to make the entire part more accurate, identify the dimensions that actually control the functional requirement.
Start with the functional requirement, then tolerance the dimensions that control it.
A clear 2D fabrication drawing is also important for communicating those requirements. See our guide to precision sheet metal fabrication drawings for additional recommendations.
5. Design for Press Brake Tool Access and Bend Sequence
A bend can look simple in CAD and still be difficult or impossible to manufacture on a press brake.
As a sheet metal part is formed, the punch must reach each bend line while previously formed flanges and other geometry remain clear of the punch, die, ram, and surrounding tooling.
Bend sequence matters. A bend that is easy to make while the part is flat may become inaccessible after another flange has already been formed.
Geometry that commonly creates press brake tooling challenges includes:
- Deep boxes
- Narrow U-shaped channels
- Tall return flanges
- Opposing flanges
- Back bends
- Bends located deep inside the part
- Closed or nearly closed geometry
- Multiple bends that restrict access to later bends
When reviewing a formed part, ask two basic questions for every bend:
- Can the press brake punch reach the bend line?
- Can the rest of the part clear the tooling throughout the bend?
If not, the solution may involve a different punch profile, gooseneck tooling, a different bend sequence, a design modification, or splitting the part into multiple components.
For a deeper look at these situations, read When Standard Press Brake Tooling Can’t Get the Job Done.
For additional visual examples and forming fundamentals, explore Approved Sheet Metal’s Sheet Metal Fab Forming Videos.
5 Sheet Metal DFM Decisions at a Glance
| Design Decision | Better DFM Approach |
|---|---|
| Material | Choose based on function, formability, availability, and cost |
| Thickness | Use commonly available thicknesses when the design requirements allow |
| Bend Geometry | Match bend radii and features to the material, thickness, and available tooling |
| Tolerances | Apply tighter tolerances to dimensions that actually control fit and function |
| Tool Access | Make sure every bend remains accessible throughout the forming sequence |
Design for the Fabrication Process Early
The best time to solve a sheet metal manufacturing problem is before the design is released.
Material, thickness, bend geometry, tolerances, and tooling access are all easier and less expensive to evaluate in CAD than after fabrication has begun.
When requesting a quote, send Approved Sheet Metal the 3D model and 2D fabrication drawing together. The 3D model helps us evaluate the geometry, forming requirements, and overall part, while the drawing communicates critical tolerances, material, hardware, finish, and other manufacturing requirements.
If our team identifies a feature that creates an unnecessary fabrication challenge, we can review practical DFM options with you before the part reaches production.
Request a quote for your next prototype or low-volume sheet metal fabrication project.
Recommended Default Sheet Metal Tolerances
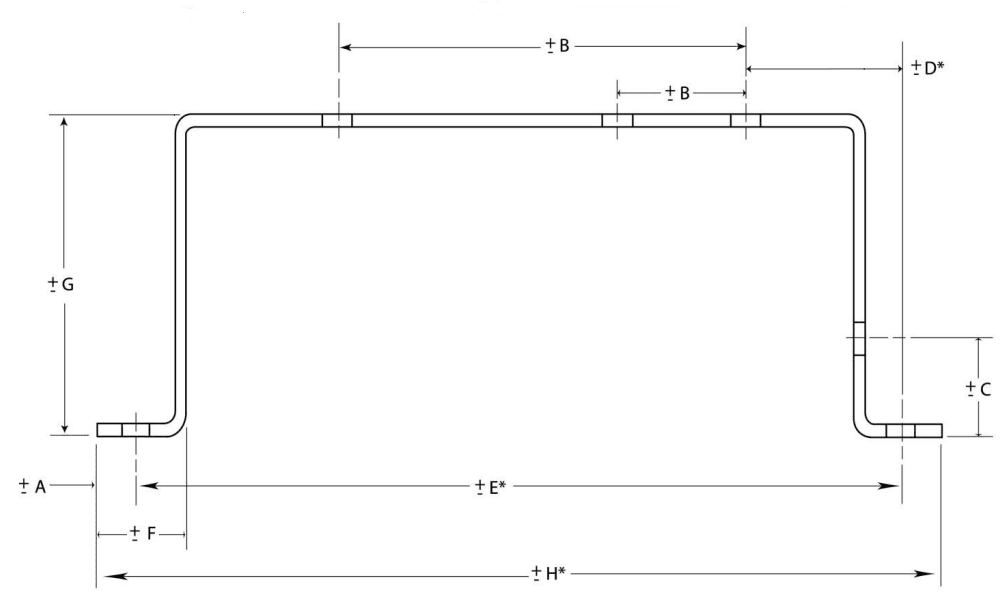
| DIM | Tolerance (MM) | Tolerance (Inches) | Description |
| A | ± 0.13 | ± 0.005 | Sheared Edge to Hole |
| B | ± 0.13 | ± 0.005 | 2 Holes on One Surface |
| C | ± 0.25 | ± 0.010 | Formed Edge to Hole |
| D* | ± 0.76 | ± 0.030 | Holes Across 2 Bends |
| E* | ± 0.76 | ± 0.030 | Holes Across 4 Bends |
| F | ± 0.25 | ± 0.010 | Sheared Edge to Bend |
| G | ± 0.38 | ± 0.015 | Across 2 Bends |
| H* | ± 0.76 | ± 0.030 | Formed Part |
Noted dimensions are to be taken while the part is in a restrained condition. Noted dimensions are for parts within a 12” envelope.
* Dimensions D, E and H are not recommended forms of dimensioning
These tolerances are recommended and best practices. We can obtain tighter tolerances (depending on part geometry/ construction), contact us for more information


